 I had already assembled my Replica One and powered it up to see that it worked. But, it was just a bare board. I had it connected to a power supply and a small USB keyboard. The Replica One didn’t have USB so I had it connected through a USB to PS2 adaptor. The whole thing sat on top of a piece of cardboard. It worked but it looked more like a bomb from a movie than a working computer. It needed a case.
Years ago, my dad and I build the Rand X computer together and that is where my hobby and my profession work in software began. I assembled the Replica One with help from Matthew. But I wanted a nice wooden case and for that, I wanted help from my dad.
We were planning a visit to Tillsonburg that summer so I prepared by drawing out a basic plan. I measured the key components. The motherboard is rectangular and I decided it would be best to have the long edge of the board run along the length of the case. The power supply would be to the left of the motherboard. Unfortunately, the power switch, serial port and video output would then have to come out the right hand side of the case. In the end, it seemed to be the best compromise so that is what we went with.
I arrived in Tillsonburg with some rough plans. It called for a shape which is more or less a rectangular box except the front, top slopes down where the keyboard is mounted. This approximated the shape of the Apple //. Also, I wanted the top of the case to be plexiglass so the board would be visible.
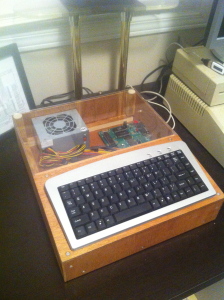
We sourced the plexi in London and went to pick up a piece. They cut it to the size we specified and when I asked, “how much?” they said not to worry about it. They had scraps bigger than that. We cut the panels to the appropriate sizes and shapes and screwed it together. We cut a large hole in the back panel for the power supply fan and power connector. We also cut a smaller opening on the right edge for the connectors on the motherboard.
We probably struggled the most with finding a good way to mount the board to our case. We ended up with small spacers which we screwed into the board and then screwed the spacers into the bottom of the case. It wouldn’t be too convenient to remove the board from the case but I didn’t plan to do that very often.
We drilled a small hole for the keyboard cable to pass through into the case so it could be connected to the board. Mom had some velcro which we often uses for their boat projects and we used to that connect the keyboard and the plexi to the case. After a couple of coats of varnish, we had a beautiful case for my Replica One.
Once I got the system home again after our trip, I remove the old piece of cardboard that everything used to sit on and cleared a spot for it on my desk. I hooked up the serial cable to the iMac and started loading programs onto it. I even got a C compiler working for the Replica One and I have coded a few things for it since then (more stories coming about that soon).
So, it sits beside me now in my computer room. I have many old computers here but it has a special place physically on my desk but also it means so much to me because of the work which went into it by Matthew, my dad and I.